Hardwood floor refinishing can transform the appearance of your home. While it’s not an easy job and involves a lot of work, it can be very rewarding.
If you have minor scratches on your hardwood floors, a good vacuuming or buffing might be enough to remove them. Larger dents and gouges might require the use of wood filler.
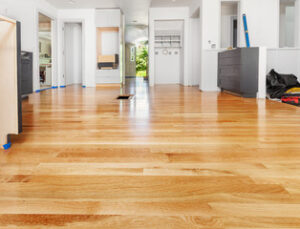
While a beautiful feature of your home, hardwood floors are not impervious to dents, scuffs, water damage and discoloration. Hardwood floor refinishing is one of the best ways to restore and extend their lifespan. Refinishing involves sanding down the old finish and stain, giving the wood a smooth surface that is then restained to create a new color.
When refinishing hardwood floors, it’s important to note that the sanding process can reveal imperfections in the wood. This is why it’s important to work with a professional sanding contractor who can deliver an even sanding that will ensure your hardwood floors look their absolute best.
Once the sanding is complete, it’s time to add a fresh coat of finish to protect the new, sanded wood. Depending on your preferences, you can choose from a variety of sheens (how much light the finish reflects) that range from matte to high-gloss. While polyurethane is the most common finish for hardwood floors, other options are available and are making a comeback due to their ability to highlight the natural beauty of your floor’s grain.
While this may seem like an easy step, it’s important to work with a reputable professional who uses the proper tools and techniques to ensure that your hardwood floors are properly sealed. Adding the wrong type of finish to your hardwood can be very damaging to the surface, causing it to yellow and crack.
It’s also important to note that it’s not necessary to remove baseboards or furniture during this process. The most important thing is to make sure that the area you are working on is completely clean and free of debris. Vacuuming between each sanding is advisable to maintain a dust-free surface.
When applying the final coat of refinish, it is a good idea to use a buffing machine fitted with a 120-grit screen. This will eliminate any minor scratches that the sanding process left behind. Once the floors are finished, it’s important to allow them to dry thoroughly before returning your furniture and rugs. In the case of a complete refinish, it is recommended that you allow 24 hours for the finish to cure fully.
Staining
The next step in a hardwood floor refinishing project is staining. Staining is the process of applying a pigmented liquid to the wood, which seeps into the pores and changes the color. There are a wide variety of stain colors available to match any interior design style. Staining is a popular part of refinishing, as it can dramatically alter the appearance of the flooring.
Before the floor is stained, it must be completely dry. This can take a day or more, depending on the stain brand and type. During this time, it is important to keep the windows open and to wear a respirator, as this step is very dusty. Work with a small section of the floor at a time, like a four-foot square, and apply the stain in the direction of the wood grain.
After the stain dries, it is important to vacuum the floor regularly to remove any dust and dirt. This will help the final results to look as good as possible. This is also the time to make any repairs or replace damaged boards, using wood putty as needed. It is a good idea to repair any gouges that may have occurred during the sanding stage.
Once the floors are completely dry, they can be resealed with either polyurethane or oil. Polyurethane is the most common topcoat, as it offers the most protection against moisture and everyday use. It comes in a variety of sheens, from matte to high gloss, although it is important to remember that a higher sheen can magnify any minor flaws.
Refinishing is an excellent way to rejuvenate the look of a home and increase its value. The cost of refinishing can vary, however, depending on the size and scope of the job. A qualified professional can typically refinish an entire room for a few hundred dollars, but the cost can quickly add up if there are many areas that need attention. If you’re considering a diy approach, it is a good idea to consult with a refinishing specialist in your area before beginning the process.
Sealing
Hardwood floors can last a lifetime, but like any surface they eventually wear out and need to be replaced. Hardwood floor refinishing provides a fresh new look and a layer of protective finish that helps prevent scratches and stains. The cost of refinishing is considerably less than replacement and can save you money in the long run by protecting your investment.
The first step in hardwood refinishing is sanding, which can take two to four days depending on the size of the room and condition of the wood. It’s important to make sure your flooring is dry and not exposed to moisture while sanding, which could cause damage to the hardwood.
If your floors are only showing superficial or surface scratches, refinishing may not be necessary. For deeper or more serious scratches and gouges, a professional is needed to assess the damage and determine the best course of action.
A quality refinishing job will not only add value to your home, but it can also help you save on future repair costs and prolong the life of your hardwood floors. A refinishing project should only be undertaken by a qualified and experienced contractor.
It’s important to take precautions when refinishing your floors yourself, especially when using a drum sander. Wear dust masks, safety glasses and ear protection to protect yourself from the particles of sanding debris. It’s also essential to keep the work area well-ventilated to reduce the risk of fume inhalation.
If you do decide to refinish your own floors, make sure to follow the manufacturer’s instructions and use a dust containment system to avoid damaging your hardwood floors. It’s also a good idea to have a non-fancy vacuum cleaner on hand for sucking up sawdust and other debris as the project continues. Lastly, be sure to choose a Bona stain, sealer and finish for fewer odors, less dust and a faster refinishing process. Ideally, summer is the best season to refinish your hardwoods since it’s less humid and you can get back in your home faster.
Refinishing
Hardwood floor refinishing is a labor-intensive project that takes four to seven days. The first step in the process is sanding, which typically requires two to four days and involves using large machines to remove all the existing finish on the hardwood floors. Once the sanding is complete, the next step is staining, which can take up to one day.
Staining is a popular technique used to enhance the color of hardwood floors. It is available in a wide range of colors and tones, and can help create an array of visual styles. Once the stain is applied, it will be followed by a protective sealant that can last up to five days.
Choosing a sheen is an important aspect of the refinishing process, as it can significantly alter the look and feel of the wood. Sheen options include high-gloss, which offers a shiny and reflective finish, semi-gloss, which provides a moderate level of shine, and satin or matte, which have low to no sheen and offer a more natural and subdued appearance. Homeowners will need to consult with a flooring professional to determine which sheen is best suited for their floors, taking into consideration aesthetic preferences and practical considerations such as the ability to hide scratches and dents.
Another important consideration is whether the floors are solid or engineered. Solid 3/4-inch hardwood can be refinished at home, but refinishing engineered wood should only be done by professionals due to its layered construction and thinner wear layer. An easy way to test the thickness of the wear layer is to sprinkle a few drops of water on the floor. If the water beads up or soaks in slowly, the wear layer is still thick enough to refinish.
Before starting the refinishing process, homeowners should remove all furniture and protect baseboards with drop cloths. In addition, shoe molding (quarter-round molding attached where the flooring meets the baseboard) should be removed. Care should be taken to avoid breaking the existing shoe molding or damaging it during the refinishing process. If a homeowner decides to replace the existing shoe molding after the floors are refinished, it is essential to choose a matching color.